

Insta360 ONE X2 Dive Case Hot on Sale
Description
Insta360 ONE X2
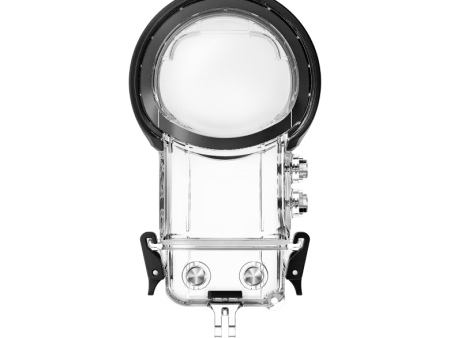
Dive Case
Dive Case

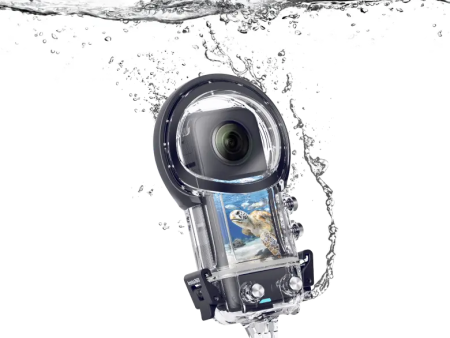
Take panoramic shots and explore the wonderful underwater world
Suitable for sports scenes such as surfing, rafting and snorkeling
Due to underwater refraction, the lens part of the diving shell adopts a spherical design to increase the viewing angle and make the overall splicing effect better. At the same time, after increasing the refraction angle, the bottom of the diving shell cannot be completely hidden. In the actual shooting effect, a small transparent block will appear at the bottom, which can be blocked by custom logo . In actual use, it is recommended to install the diving shell and the buoyancy rod vertically to reduce the influence of the small transparent block at the bottom of the diving shell on the screen.
Procedure
1. Open the Case
Lift the buckle as shown below, then pull it down to remove it from the hook. Repeat with the other buckle. When both sides are disengaged, open the Dive Case.
2. Insert the Anti-Fog Inserts
Ensure that two anti-fog inserts are inserted as shown below.
Note:
1) When installing anti-fog inserts, align their holes so that the inserts do not cover the camera s status indicators.
2) When using third-party anti-fog inserts, ensure that the size is within 32x18x1mm. If the inserts are too large, they will cause water leakage and potentially damage the camera.
3. Insert the Camera
Install the Dive Case s lower cover
Install the Dive Case s upper cover
Note:
1) When using the camera in water, please lock the touch screen to avoid accidental presses.
2) When inserting the camera, take care not to scratch the lens.
4. Close the Case
To close the Dive Case, latch the buckle onto the case s hook and firmly push down until it clicks.
1) Ensure the Dive Case is firmly closed. Be sure that the parts of the Dive Case in contact with its rubber seal are free of dirt or dust.
2) For the best results, keep the lenses of the Dive Case clean.
5. Attach the Stabilizer Ring
When connecting the Dive Case to other accessories, such as the floating hand grip, be sure to stick a stabilizer ring to the screw points.
![src=]()
6. Stitch
After capturing with the Dive Case, connect ONE X2 to your phone, open files taken with the Dive Case in the app and select Stitch for Dive Case.
Specs
Dimensions: 153.9mmx67.0mmx83.7mm
Weight: 131g
Main Material: PC
Related products
Insta360 X3 Dive Case Cheap
Original price was: $69.36.$34.68Current price is: $34.68.
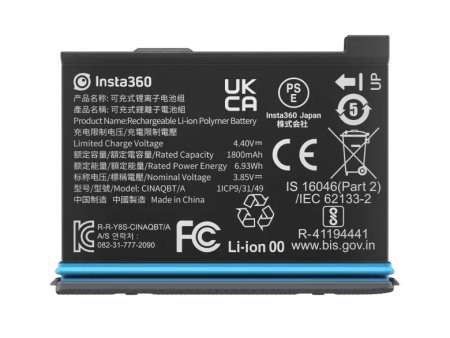
Insta360 X3 Power Accessories: Battery (1800mAh) Online Sale
Original price was: $29.58.$14.79Current price is: $14.79.
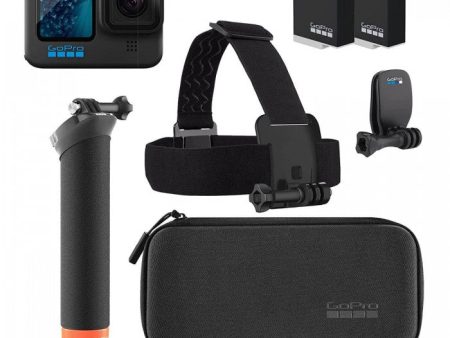
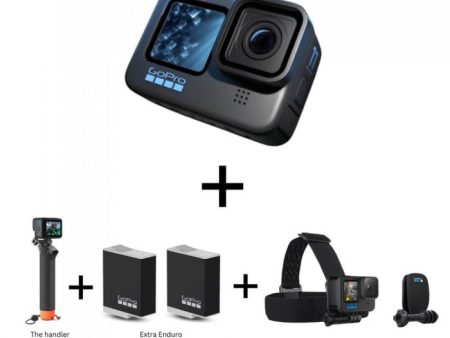
GoPro HERO11 Black + Accessories Bundle – Waterproof Action Camera with Accessories For Discount
Original price was: $436.56.$218.28Current price is: $218.28.
Insta360 X3 Sticky Lens Guards Discount
Original price was: $13.26.$6.63Current price is: $6.63.
Feiyu WG2X 3-Axis Wearable Gimbal Camera Stabilizer for Action Cameras Online Hot Sale
Original price was: $139.62.$69.81Current price is: $69.81.

hypeussuper.shop © 2025 All Rights Reserved
-
-
Select the fields to be shown. Others will be hidden. Drag and drop to rearrange the order.
- Image
- SKU
- Rating
- Price
- Stock
- Description
- Weight
- Dimensions
- Additional information
- Add to cart
Take panoramic shots and explore the wonderful underwater world
Suitable for sports scenes such as surfing, rafting and snorkeling
Procedure
1. Open the Case
Lift the buckle as shown below, then pull it down to remove it from the hook. Repeat with the other buckle. When both sides are disengaged, open the Dive Case.
2. Insert the Anti-Fog Inserts
Ensure that two anti-fog inserts are inserted as shown below.
Note:
1) When installing anti-fog inserts, align their holes so that the inserts do not cover the camera s status indicators.
2) When using third-party anti-fog inserts, ensure that the size is within 32x18x1mm. If the inserts are too large, they will cause water leakage and potentially damage the camera.
3. Insert the Camera
Install the Dive Case s lower cover
Install the Dive Case s upper cover
Note:
1) When using the camera in water, please lock the touch screen to avoid accidental presses.
2) When inserting the camera, take care not to scratch the lens.
4. Close the Case
To close the Dive Case, latch the buckle onto the case s hook and firmly push down until it clicks.
1) Ensure the Dive Case is firmly closed. Be sure that the parts of the Dive Case in contact with its rubber seal are free of dirt or dust.
2) For the best results, keep the lenses of the Dive Case clean.
5. Attach the Stabilizer Ring
When connecting the Dive Case to other accessories, such as the floating hand grip, be sure to stick a stabilizer ring to the screw points.
![src=]()
6. Stitch
After capturing with the Dive Case, connect ONE X2 to your phone, open files taken with the Dive Case in the app and select Stitch for Dive Case.
Specs
Dimensions: 153.9mmx67.0mmx83.7mm
Weight: 131g
Main Material: PC
Related products
Insta360 X3 Dive Case Cheap
Original price was: $69.36.$34.68Current price is: $34.68.
Insta360 X3 Power Accessories: Battery (1800mAh) Online Sale
Original price was: $29.58.$14.79Current price is: $14.79.
GoPro HERO11 Black + Accessories Bundle – Waterproof Action Camera with Accessories For Discount
Original price was: $436.56.$218.28Current price is: $218.28.
Insta360 X3 Sticky Lens Guards Discount
Original price was: $13.26.$6.63Current price is: $6.63.
Feiyu WG2X 3-Axis Wearable Gimbal Camera Stabilizer for Action Cameras Online Hot Sale
Original price was: $139.62.$69.81Current price is: $69.81.
hypeussuper.shop © 2025 All Rights Reserved
-
-
Select the fields to be shown. Others will be hidden. Drag and drop to rearrange the order.
- Image
- SKU
- Rating
- Price
- Stock
- Description
- Weight
- Dimensions
- Additional information
- Add to cart
Note:
1) When using the camera in water, please lock the touch screen to avoid accidental presses.
2) When inserting the camera, take care not to scratch the lens.
4. Close the Case
To close the Dive Case, latch the buckle onto the case s hook and firmly push down until it clicks.
1) Ensure the Dive Case is firmly closed. Be sure that the parts of the Dive Case in contact with its rubber seal are free of dirt or dust.
2) For the best results, keep the lenses of the Dive Case clean.
5. Attach the Stabilizer Ring
When connecting the Dive Case to other accessories, such as the floating hand grip, be sure to stick a stabilizer ring to the screw points.
![src=]()
6. Stitch
After capturing with the Dive Case, connect ONE X2 to your phone, open files taken with the Dive Case in the app and select Stitch for Dive Case.
Specs
Dimensions: 153.9mmx67.0mmx83.7mm
Weight: 131g
Main Material: PC
Related products
Insta360 X3 Dive Case Cheap
Original price was: $69.36.$34.68Current price is: $34.68.
Insta360 X3 Power Accessories: Battery (1800mAh) Online Sale
Original price was: $29.58.$14.79Current price is: $14.79.
GoPro HERO11 Black + Accessories Bundle – Waterproof Action Camera with Accessories For Discount
Original price was: $436.56.$218.28Current price is: $218.28.
Insta360 X3 Sticky Lens Guards Discount
Original price was: $13.26.$6.63Current price is: $6.63.
Feiyu WG2X 3-Axis Wearable Gimbal Camera Stabilizer for Action Cameras Online Hot Sale
Original price was: $139.62.$69.81Current price is: $69.81.
hypeussuper.shop © 2025 All Rights Reserved
-
-
Select the fields to be shown. Others will be hidden. Drag and drop to rearrange the order.
- Image
- SKU
- Rating
- Price
- Stock
- Description
- Weight
- Dimensions
- Additional information
- Add to cart
After capturing with the Dive Case, connect ONE X2 to your phone, open files taken with the Dive Case in the app and select Stitch for Dive Case.
Specs
Dimensions: 153.9mmx67.0mmx83.7mm
Weight: 131g
Main Material: PC
Related products
Insta360 X3 Dive Case Cheap
Original price was: $69.36.$34.68Current price is: $34.68.
Insta360 X3 Power Accessories: Battery (1800mAh) Online Sale
Original price was: $29.58.$14.79Current price is: $14.79.
GoPro HERO11 Black + Accessories Bundle – Waterproof Action Camera with Accessories For Discount
Original price was: $436.56.$218.28Current price is: $218.28.
Insta360 X3 Sticky Lens Guards Discount
Original price was: $13.26.$6.63Current price is: $6.63.
Feiyu WG2X 3-Axis Wearable Gimbal Camera Stabilizer for Action Cameras Online Hot Sale
Original price was: $139.62.$69.81Current price is: $69.81.
hypeussuper.shop © 2025 All Rights Reserved
Related products
Insta360 X3 Dive Case Cheap
Insta360 X3 Power Accessories: Battery (1800mAh) Online Sale
GoPro HERO11 Black + Accessories Bundle – Waterproof Action Camera with Accessories For Discount

Insta360 X3 Sticky Lens Guards Discount
Feiyu WG2X 3-Axis Wearable Gimbal Camera Stabilizer for Action Cameras Online Hot Sale
- Image
- SKU
- Rating
- Price
- Stock
- Description
- Weight
- Dimensions
- Additional information
- Add to cart